Edible Gardening Group
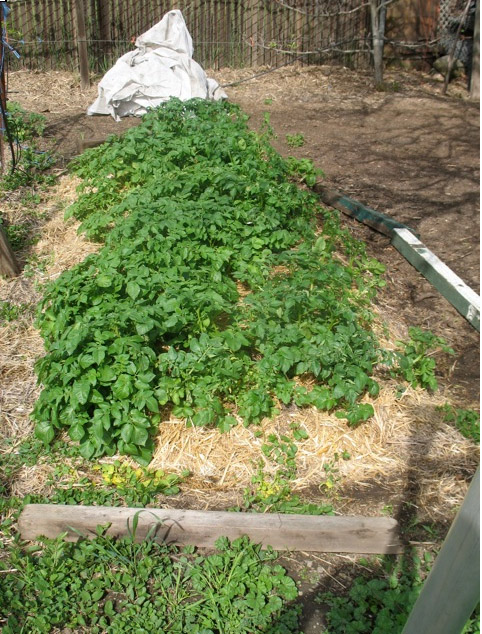 |
Planting PotatoesPlanting and growing potatoes is not as difficult as for most vegetables. Following is a summary of basic things to remember. They may vary a little depending on the " method " that you choose to use. I will describe the basic method that I have been using for years. I think it works well and has numerous advantages. Mainly, it is the easiest in terms of work, conserves water, and provides for a long harvest period. THE SOILAs with everything in the garden the soil is the most important thing that will determine the product. Potatoes like rich, loose soil that is damp and cool. If you don't have this you need to add amendments to move in this direction. Compost, needed nutrients ( based on a soil test ), rice hulls ( if you have heave, hard soil ), and a deep mulch to save water, cool the soil and enrich the soil after the crop is out. I think straw does the best job for a mulch. The soil should be worked with all your amendments. If it is wet and sticky you will have to worry about the seed potatoes rotting or developing fungus disease. Planting in loose , dry soil is the best prevention. Potatoes like soil in the 55 to 70 degree range. The period to maturity will be round 90 days, however you can pick some early, they will just be smaller. You can also leave them in the ground for a long time if they stay dry and have a good cover of mulch to keep them cool.They are very productive. They easily return 10 to 15 lbs. from a lb. of seed potato. Plant 10 lbs. and get a hundred. Not a bad return for little work. THE METHODThere are many methods of growing potatoes . I have attached an article that briefly compares 7 methods. You should be able to find one that you like. The method that i am going to describe is planting in a bed under a heavy mulch of straw. Th following picture is of a bed of volunteer potatoes that came up this winter from where I planted last year. This was taken tuesday of this week. These have had to be covered to protect them from frost, which will kill them. They may come back but they never really recover. Too much work? Don't do it. These were grown by the straw mulch method last year and I have added a little more straw this winter, but not since the rain has got them really growing. PREPARING THE SOILTurn the soil and do what you need to do to get it as described above. Double digging is a good first step if you have not done this in the planting area for a few years. It will be the hardest task , but it is not just for potatoes. It is to get your garden soil in good condition for any future planting. I won't go into this any further here. PREPARING THE SEED POTATOESPotatoes need to be sprouting for best results. The sprouts can be small, but there should be signs of growth. If not put then in a warm place out of direct sunlight and they will start. If you get them in the store they have probably been treated to stop them from sprouting, so don't use them. The best source of seed potatoes is Irish Eyes Garden Seeds (www.irisheyesgarden seeds.com ). THey have a lot of varieties and are expensive. The best local source that I am aware of is Lockharts Seeds in Stockton. In bulk they are $.55 a lb. But they only have the good basic varieties. When your seed is sprouting you can plant the whole potato or cut it into pieces with two or three eyes per piece. I prefer to plant them whole , but it is hard to get them small enough. About the size of an egg. Planting a big one whole will produce too many roots and growth in a small space. Once cut there is differing opinion as to what to do next. Some say, plant immediately. Some say wait 24 hours. I have done it both ways. |
PLANTING THE SEED
Take your piece of seed and push it into your prepared soil. Just a couple of inches. Don't cover it at this time. Space the seeds 10 to 12 inches on center in your favorite pattern. Plant your whole bed. The size of a double bed is a good size. I then spread a light covering of compost over the bed and rake it smooth. ( about 1 to 1.5 in. ) If it is dry I will thn wter the bed. If the groung is wet, leave it alone for a few days, or until it rains.
MULCHING
Now place a good covering ( 5 to 8 inches ) of straw over the bed. Then you can go to bed. You are done for the day.
CARE
There should be very little. Potatoes ned a moist environment so once the rain is gone they need to be watered. Water them good because the mulch will take up a lot before it gets to the potatoes. But the mulch will keep the moisture in, so water when the ground starts to get dry and water the bed good. There should be very few weeds, and no cultivation.
HARVESTING
It is suggested that once the plants start flowering, stop watering. Once the plants start to die, start harvesting. Actually you can start harvesting as soon as the potatoes are big enough for you. You and gently reach into the straw and top soil and find the potatoes and remove them with out disturbing the rest on the plant. This will extend your harvest season. If you have a dark, cool place to store your potatoes you can keep them for an extended period. If not, pile on the straw and just leave them in the dry ground until you need them.
7 Ways to Plant Potatoes By Doug Hall
We tested 7 easy ways to grow potatoes: 4 in containers, 3 in the ground.
In April 2010, I planted organic 'German Butterball' seed potatoes in the Organic Gardening test plots near Emmaus, Pennsylvania, using the following seven methods. For the five raised planting techniques, I used a mixture of 2 parts topsoil to 1 part compost. Through the course of the growing season, the benefits and drawbacks of each became clear.
Hilled RowsDig straight, shallow trenches, 2 to 3 feet apart, in prepared soil. Plant seed potatoes 12 inches apart and cover with about 3 inches of soil. When the shoots reach 10 to 12 inches tall, use a hoe or shovel to scoop soil from between rows and mound it against the plants, burying the stems halfway. Repeat as needed through the growing season to keep the tubers covered. | |
| Pros: No containers to buy or build; no soil to transport. This is a simple, inexpensive, and proven method that farmers have used for millennia. Practical for large-scale plantings. | Cons: Yield may be limited by the quality of the soil. In places where the soil is badly compacted or low in organic matter, one of the aboveground techniques might work better. |
Straw MulchPlace seed potatoes on the surface of prepared soil, following the spacing specified for hilled rows, and cover them with 3 to 4 inches of loose, seed-free straw. Mound more straw around the stems as they grow, eventually creating a layer a foot or more in depth. | |
| Pros: The thick mulch conserves soil moisture and smothers weeds. Harvest is effortless with no digging. This method is suggested as a way to thwart Colorado potato beetle. | Cons: Yield in the test plot was slightly less than in the hilled row. Field mice have been known to use the cover of straw to consume the crop. |
Raised BedLoosen the soil in the bottom of a half-filled raised bed. Space seed potatoes about 12 inches apart in all directions and bury them 3 inches deep. As the potatoes grow, add more soil until the bed is filled. If possible, simplify harvest by removing the sides. | |
| Pros: This method yielded the largest harvest in my trials, and the potatoes were uniformly large. Raised beds are a good choice where the garden soil is heavy and poorly drained. | Cons: The soil to fill the bed has to come from somewhere-and it takes a lot. |
Grow BagCommercial growing bags are constructed of heavy, dense polypropylene. Put a few inches of a soil-compost mixture in the bottom of a bag, then plant 3 or 4 seed potato pieces and cover with 3 inches of soil. Continue adding soil as the plants grow until the bag is filled. To harvest, turn the bag on its side and dump out the contents. | |
| Pros: Grow Bags can be placed on patios or driveways or used where garden soil is of inferior quality. The bags should last for several growing seasons. Their dark color captured solar heat to speed early growth. Harvest was simple, and the yield was impressive, considering the small space each bag occupies. | Cons: This is a pricy technique. The brand of bag I used costs $12.95. |
Garbage BagPlant a large plastic garbage bag following the instruction for a Grow Bag, punching a few holes through the plastic for drainage. Roll the top edge of the bag to help it stay upright; otherwise the bag is prone to sag and spill soil. To harvest, rip the bag and dump out the contents. | |
| Pros: Like the Grow Bags, a garbage bag can be employed where in-ground growing is not an option. Black bags capture solar heat to speed early growth. | Cons: Aesthetically, this is the least appealing choice. Yield was meager, perhaps because the thin plastic allowed the soil to heat up too much, limiting tuber formation. |
Wood BoxBuild a bottomless square box (I used lumber from discarded pallets). Plant the same as for a raised bed. The box is designed so additional slats can be screwed to the sides as the plants grow and soil is added. In theory, a bottom slat can be temporarily removed to facilitate the harvest of new potatoes. For the final harvest, tip the box and dump out its contents. | |
| Pros: This is another raised strategy for growing potatoes where the garden soil is of poor quality. Yield was similar in quantity to that of a raised bed. | Cons: A lot of time and effort went into the construction of the box. I felt the results did not justify the effort. |
Wire CylinderUsing hardware cloth with ¼-inch mesh, fashion a cylinder about 18 inches in diameter and 24 inches tall. Put several inches of soil in the bottom, then plant 3 or 4 seed potatoes and cover them with 3 inches of soil. Continue to add soil as the potatoes grow. To harvest, lift the cylinder and pull the soil back to expose the tubers. | |
| Pros: In a climate with incessant spring rains, the wire mesh would provide excellent drainage and prevent the soil from becoming waterlogged. This is another raised technique to consider where garden soil is poor. | Cons: I harvested a limited number of undersized tubers from the cylinders-a dismal showing, probably because the soil-compost mixture I used dried out so quickly that the plants lacked adequate moisture. |
Potato
Potato is a cool-season vegetable that ranks with wheat and rice as one of the most important staple crops in the human diet around the world. The white potato is referred to as the "Irish potato" because it is associated with the potato famine in Ireland in the 19th century. Potatoes are not roots but specialized underground storage stems called "tubers." Maximal tuber formation occurs at soil temperatures between 60° and 70°F. The tubers fail to form when the soil temperature reaches 80°F. Potatoes withstand light frosts in the spring and can be grown throughout most of the country in the cooler part of the growing season, but they prefer the northern tier of states for maximal yield and quality.
Recommended Varieties
There are more than 100 varieties of potatoes. White-skinned (actually very light brown) and red-skinned varieties with white flesh are the most common in home gardens. Some russets and yellow-fleshed types are also grown. Russet Burbank is the most important commercial variety produced in the United States, but the weather over most of the country is too warm and the moisture fluctuation too great for the production of smooth tubers and good yields. Common garden varieties offer better taste, texture and cooking quality for home use anyway.
The following varieties are well adapted to a variety of conditions. If possible, use northern-grown seed potatoes that are certified disease free.
Early
Irish Cobbler (light brown skin; often irregularly shaped)
Norland (red skin, smooth, resistant to scab)
Midseason
Red Pontiac (red skin, deep eyes)
Viking (red skin, very productive)
Late
Katahdin (light brown skin; smooth; resistant to some viruses, verticillium, bacterial wilts)
Kennebec (light brown skin, smooth; resistant to some viruses, late blight)
Green Mountain is an old semi-rough white variety noted for its great taste. Due to a fairly high number of misshapen tubers, it has all but disappeared from commercial production. For dependable production in all seasons and the greatest-tasting baked potato ever, Green Mountain is worth the effort to find certified seed.
Yukon Gold is the most famous of the new wave of yellow-fleshed varieties now available. Long popular in Europe, these have good flavor and moist flesh, which many people claim requires less of the fattening condiments required by dry-as-dust Russet Burbanks. Yukon Gold is a very early bearer of large, round, attractive tubers with a hint of pink around the eyes. Many grocery stores around the country now feature some name-brand version of "golden" potatoes, usually this variety. If the flavor of these market potatoes suits you, look for seed of Yukon Gold.
When to Plant
Potatoes are among the earliest vegetables planted in the garden. Early, midseason and late varieties all may be planted in March or early April. Planting too early in damp, cold soils makes it more likely that seed pieces rot before they can grow. Potatoes planted in March also may be frozen back to the ground by late frosts. Plants usually recover fully, but the blackened shoots are always demoralizing to the gardener. Medium-early plantings, when soils have dried and warmed, may do as well as extremely early, winter-defying plantings. Midseason and late varieties may be planted as late as the first of July. Late potatoes are best for winter storage.
Spacing & Depth
Potatoes are started from "seed pieces" rather than from true seed. These seed pieces may be small whole potatoes or potatoes that are cut into 1-1/2 to 2 ounce pieces. Plant the pieces soon after cutting. Be sure that there is at least one good "eye" in each seed piece. Some garden centers and seed suppliers sell "potato eyes" that weigh less than an ounce. These may be too small for optimal production. Small, whole, certified seed potatoes are often the best choice for home gardeners.
Plant seed pieces 10 to 12 inches apart and cover in a furrow between 1 and 3 inches deep. Space rows 24 to 36 inches apart. The 24 inch spacing is often beneficial because the plants shade the soil and prevent high soil temperatures that inhibit tuber development.
"Straw Potatoes"
Potatoes grown by a special cultural method in that they are not hilled or cultivated after planting are called "straw potatoes." The seed pieces and rows should be spaced the same as for conventional cultivation, but the seed pieces are planted at the soil surface. Place loose straw 4 to 6 inches deep over the seed pieces and between the rows. Potato sprouts should emerge through the straw cover. Cultivation should not be necessary. Pull any weeds that manage to emerge through the straw cover and add more straw through the season if decomposition starts to thin the layer. Harvest by carefully removing the straw and picking up the tubers that lie on the soil surface. In addition to weed control, strawing has several other advantages. The straw keeps the soil temperature more uniform and about 10°F cooler, reduces water loss and results in better-shaped tubers. It is usually more rewarding to straw late varieties than early ones because there is a longer period for tuber development. Many gardeners who grow potatoes for competition in exhibits and fairs use the strawing method because the potatoes are of excellent size, color, shape and smoothness.
Care
The soil should be fertile and well drained. Clay soils should be improved with organic matter and plowed deeply in the fall. If space allows, a cover crop such as clover, buckwheat or winter rye grown in the potato bed the year before potatoes are planted improves soil structure, organic-matter content and subsequent potato production.
Mulch is usually beneficial in growing potatoes. After the potato plants have emerged, organic mulch can be applied to conserve moisture, help keep down weeds and cool the soil. Some gardeners cover rows of early potatoes with clear plastic film at planting to warm the soil and promote early growth when the soil temperature is low. When the plants emerge, remove the film to allow the plants to grow unrestricted.
After the potatoes break the surface of the ground, gradually build up a low ridge of loose soil by cultivation and hoeing toward the plants. This ridge, which may become 4 to 6 inches high by summer, reduces the number of "sunburned" (greened) tubers. The object of potato cultivation is to eliminate competition from weeds, to loosen and aerate the soil and to ridge the row. Misshapen potatoes develop in hard, compact soil. Use extreme caution when hoeing near potato plants because developing tubers are easily cut and ruined.
Irrigate to assure uniform moisture while the tubers are developing. A uniform moisture supply also helps to cool the ground and eliminate knobs caused by secondary growth.
Harvesting
Harvest potatoes after the vines have died. Handle as gently as possible during harvest. Because the tubers develop 4 to 6 inches beneath the soil surface, a shovel or spading fork is a useful tool for digging potatoes.
Potatoes for use in early summer ("new potatoes")may be dug before the vines die (usually in July). When the potatoes reach 1 to 2 inches in size, you may wish to dig a few hills to use for soup or to cook with creamed peas or to butter and roast.
Late potatoes are usually dug in August or early September. They keep in the garage or basement for several weeks in their natural dormancy. Store over the winter in a dark room at a temperature between 38° and 40°F with high humidity. Check periodically for spoilage. Temperatures below 38°F cause internal damage to the tubers.
Common Problems
Flea beetles are shiny, usually black, beetles that often are not seen due to their small size (1/16 inch) and ability to jump quickly from plants when disturbed. They attach cabbage, Chinese cabbage, eggplant, radish, spinach, sweet corn, turnip and potato. Flea beetles scratch holes or leave white streaks in green foliage in late spring. Intense feeding results in wilting and dying of leaves and decreased yield.
Leafhoppers are up to 3/8 inch long, green in color, and wedge-shaped. They may migrate from one area of garden to another and hop away in large numbers when foliage is disturbed. They attack bean, carrot, cucumber, Irish potato, and muskmelon. Symptoms of leafhopper damage includes curled or crinkled foliage and "hopper burn" (caused by leafhoppers' feeding, indicated by brown edges on leaves).
Questions & Answers
Q. Should I save some of my potatoes for seed?
A. No, unless you are saving seed of an heirloom variety not commercially available. Saving your own seed potatoes can lead to a buildup of viruses and diseases. Whenever possible, plant seed potatoes certified to be free from certain viruses and diseases.
Q. My potato plants flowered and formed green fruits that resemble small tomatoes. What are they?
A. These small seed balls are the fruits that contain the true seeds. They are not edible. Except for breeding purposes, growing potato plants from the true seeds in these fruits is a troublesome and unrewarding exercise.
Q. What causes green skin on my potatoes?
A. The green areas on tubers develop where the potato was exposed to the sun. This condition occurs when the potatoes were not planted deeply enough or not covered with straw. The green portions taste bitter because they contain a moderately poisonous alkaloid. These green areas should be cut off and discarded. Exposure of potato tubers to fluorescent light or sunlight causes greening during storage.
Q. How should potatoes that are cut into seed pieces be cured?
A. They can be cured by holding them for a week at 60° to 65°F with high humidity (85 percent or higher). This treatment is of questionable value for the home gardener.
Q. Can I make chips from homegrown potatoes?
A. Yes. Almost any potato variety can be used to make chips when the potatoes are freshly dug and starchy. Commercial chips are made from selected varieties that are naturally high in solids, carefully handled and properly stored to preserve starch and avoid buildup of sugars. Chips made from potatoes stored at low temperatures for long periods are brown or have a dark ring because they contain excessive amounts of sugar.
Q. Can I use grocery store potatoes for planting?
A. Probably not. They may have been treated with a sprout retardant, in which case, they will not grow. Even if they are sprouting, they have not been inspected and certified free of disease. While results occasionally may be acceptable, the risk of introducing a nematode, disease, or other pest is much higher than from quality-certified seed potatoes.
Selection & Storage
Potatoes are the most popular vegetables in the United States. Although there are more than 100 known varieties, about six varieties make up the entire commercial market. Home gardeners are able to taste some of the wonderful flavors and textures unknown to the average person. Some varieties are not considered marketable because they do not ship well or are prone to disease.
Potatoes are generally classified as round red, round white, oblong white and yellow-fleshed. New potatoes are any variety of freshly dug young potato that hasn't been stored. Potatoes can be harvested at any stage of development from marble-size to full maturity. Potato size at maturity depends on the variety planted. Potatoes should be firm, free of soft spots, and free of disease when harvested.
Even stored under the best conditions, potatoes lose some quality the longer they are stored. For best results, store in a cool, dark place with good air circulation. Do not refrigerate potatoes. Cold temperatures convert starch to sugar, giving potatoes an uncharacteristic sweet taste. The sugar caramelizes during cooking producing brown potatoes and an off flavor. Potatoes can be stored for a week or two at room temperature (65 to 70 degrees) with good results.
If potatoes start to sprout, they can still be eaten. Remove the sprouts and discard. If the potato is still firm, it is good to eat. Shriveled, wrinkled, sprouting potatoes should not be eaten. Green-skin potatoes have been exposed to too much light. A mildly toxic alkaloid called solanin forms in the skin. The green skin can simply be peeled away. Although the remaining potato is safe to eat, it will not be at its best.
Nutritional Value & Health Benefits
Potatoes were once considered just a dietary source of starch. Although potatoes do contain a goodly amount of carbohydrate (starch and sugar) they are also a storehouse for many vitamins and minerals. With the exception of vitamin A, potatoes have at least some of just about every nutrient, including fiber. Potatoes are relatively low in calories, unless they are eaten with butter, sour cream and mayonnaise.
Nutrition Facts (1 oblong white, baked, about 2" x 4-3/4")
Calories 145Protein 3.06 grams
Carbohydrates 33.63 grams
Dietary Fiber 2.34 grams
Calcium 7.80 mg
Iron .55 mg
Magnesium 39.00 mg
Potassium 609.96 mg
Phosphorus 78.00 mg
Vitamin C 19.97 mg
Niacin 2.17 mg
Folate 14.20 mcg
Preparation & Serving
Potatoes can be boiled, fried, steamed, grilled or baked. All potatoes should be cooked or placed in water immediately after peeling to prevent discoloration. To peel or not to peel is generally a result of the preparation method or personal preference. The exceptions are thin-skinned new potatoes, which should not be peeled.
Potato varieties should be selected based on their use in a recipe. New potatoes are moist and waxy and are best for steaming, boiling and in salads. Oblong mature white potatoes are rather dry and starchy. They are the most popular french-fried potato and they are great for baking and mashing. Round red potatoes have a rather waxy texture making them ideal for boiling and mashing. Round white potatoes are thin-skinned and hold their shape in salads as well as boiling and roasting. Yellow-fleshed potatoes are good for steaming, roasting, and mashing.
Fresh garden herbs that enhance the flavor of potatoes include basil, chives, cilantro, dill, fennel, lovage, marjoram, oregano, parsley, rosemary, sage, tarragon and thyme.
Home Preservation
Potatoes do not freeze, dry or can with good results. For long term storage of late fall crops, store at temperatures of 45 to 50°F. After harvesting, place in the sun for two to three hours to dry, brush off the soil, do not wash until ready to use. If storage temperatures are too high, potatoes tend to soften and sprout. Store in a dark place to prevent greening and layer between sheets of newspaper so if one spoils it will not spread to the whole lot.
Recipes
New Potatoes with Garlic and HerbsUsing a vegetable brush, gently scrub potatoes under cold running water. Do not peel the thin skin away. The fresh herbs and garlic compliment the potato flavor rather than overwhelm it. Use any fresh herb available to you.
8 to 10 small new potatoes2 tablespoons olive oil
3 cloves garlic, peeled
1/4 cup fresh parsley, dill or thyme leaves
1 teaspoon each, freshly ground pepper and salt
- Cut potatoes in half, then quarters then across quarters into cubes (about 2 cups). Place in a colander, and rinse well under cool running water. Place in a saucepan with enough water to just cover the potatoes. Bring to a boil, reduce heat, cook for 15 minutes or until potatoes are tender.
- Meanwhile, chop the parsley together with the garlic until finely minced.
- Drain the potatoes and toss with olive oil. Add parsley/garlic mixture, salt and pepper and toss until combined. Makes 4 servings.